
How to use a compressor
One of the most essential effects in audio production. The Compressor in Soundation features everything you’d expect to find in a modern DAW plugin or hardware equipment. The only difference is here you have an excellent audio compressor online.
- With Compressor
- Without Compressor
What does an audio compressor do?
Many times you will find that an audio recording varies a lot in volume. For example, you may have a vocal track that sounds great during one part of the song as you’re adjusting the volumes of a mix, but later on, drowns in other sounds. Using a compressor is a very efficient way to help keep an audio signal predictable and consistent in volume.
The compressor is an audio effect that evens out the volume automatically, based on its settings. It reduces (compresses) the dynamic range of the signal input - in other words, it evens out the overall volume by making the lowest parts louder and the loudest parts lower.
Sound compressors can also bring out the character in a sound, make drums more punchy, have things sit better in the mix, or glue everything together.
Start using the Compressor effect
How to use the compressor in Soundation
Using compressor presets [Easy]
We have made lots of great-sounding compressor settings for you already, all you need to do is add them to your track and pick the preset that suits your particular sound.
- 1Open Soundation and create a project
- 2Mark the channel you want to add the effect to by clicking it
- 3Click "+ Add effect" in the bottom panel
- 4Choose Compressor from the menu
- 5Click “Default” in the top-right corner of the compressor and pick a preset from the drop-down menu
How to tweak a compressor [Pro]
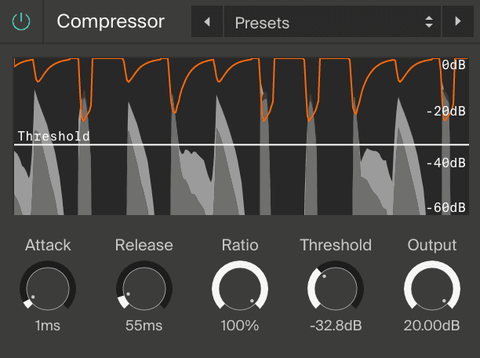
When you set a compressor up it’s a good idea to begin with the Threshold. You’ll see a visual representation of the audio signal as well as a white line that represents the threshold. When the threshold crosses the audio signal is when it actually starts doing something with the sound. Anything that passes the threshold in volume will be shaped by the compressor, so begin by lowering it to start hearing the effect.
The Attack and Release options shape the transients, making something more or less punchy. These are measured in ms - milliseconds. From the time the volume hits the threshold, the audio signal will be fully compressed once the attack time has passed and fully uncompressed once the volume is below the threshold and the release time has passed.
A fast attack means the compressor will instantly start working once the volume hits the threshold while a slower attack means a less dramatic effect, a fast release means the compressor will quickly let go after the volume sinks below the threshold while a slower release means it will take longer to stop compressing.
The Ratio defines how hard the audio signal will be compressed. A 1:1 ratio means it’s not compressing at all and all dynamics are intact, 4:1 is medium compression where it will already start sounding a bit unnatural. Going above that will start killing the dynamics. Be careful with how much compression you add in total to each channel, it’s easy to go overboard in the beginning because of how dramatically different and “more professional” your audio can sound.
Finally, you can adjust the overall output level of the processed sound with the Output knob. You typically need to adjust the output gain after compressing your audio because the volume will be different after the effect has processed it.
Parameters
Let’s go through the parameters of the Compressor one by one again:
Threshold
Threshold governs when the compressor should start to compress the incoming signal. For example, if we imagine a signal has an amplitude register of 0 to 10 (0 being silent and 10 full volume), and you set the threshold to 6, the compressor will only compress the part of the signal that is louder than 6.
Attack
Attack governs when the compressor kicks in after the signal has reached the threshold. By having a slow attack time you will allow for some of the snap/transients from the input signal to be unaffected.
Release
Release governs when the compressor will decrease gain reduction to the level determined by the ratio, in other words for how long it will compress the signal.
Ratio
Ratio governs how much compression takes place above the threshold.
Output
Output - often called “gain” or "makeup gain", governs how loud the output signal from the compressor will be. This is handy since you can bring back the volume you've lost compressing the signal.


